Setting up computing environments after the workshop
Background
You will continue to have access to RStudio Server and the files in your home directory for 6 months following this workshop.
We recognize there may be circumstances where you will need to process files locally.
Running the same software that we use for training on your local computer can be challenging, particularly for Windows users.
(For example, some command-line tools we use during our training modules, like salmon, are not supported on Windows.)
On this page, we’ll introduce two different approaches you can use to access the same computing environment we used in the workshop:
The first strategy uses Docker, a software that allows us to package a computing environment such that it can be fully reproduced between different computers and operating systems; it is sometimes referred to as a “lightweight virtual machine.” We have put together a Docker image that fully replicates the computing environment, including all software dependencies (both R packages and command-line tools) we use during the workshop on the RStudio Server.
The second strategy uses renv, an R package for managing R package versions.
Using renv will provide you with R packages at the same versions used in the workshop, but unlike Docker, it will not provide command-line tools (e.g., salmon) or an RStudio Server to access via browser.
Using Docker post-workshop
- You can find instructions for installing Docker Desktop on your operating system in the Docker documentation at this link: https://docs.docker.com/get-docker/.
- You can find full documentation for using Docker Desktop at this link: https://docs.docker.com/desktop/use-desktop/.
Obtain the Docker image
Once you’ve installed Docker Desktop, you will need to pull the appropriate image using the command line:
- On macOS, search for and open
Terminal. - On Windows, search for and open
Command Prompt.
In your respective command line interface, copy and paste the following:
docker pull ccdl/training_rstudio:edge
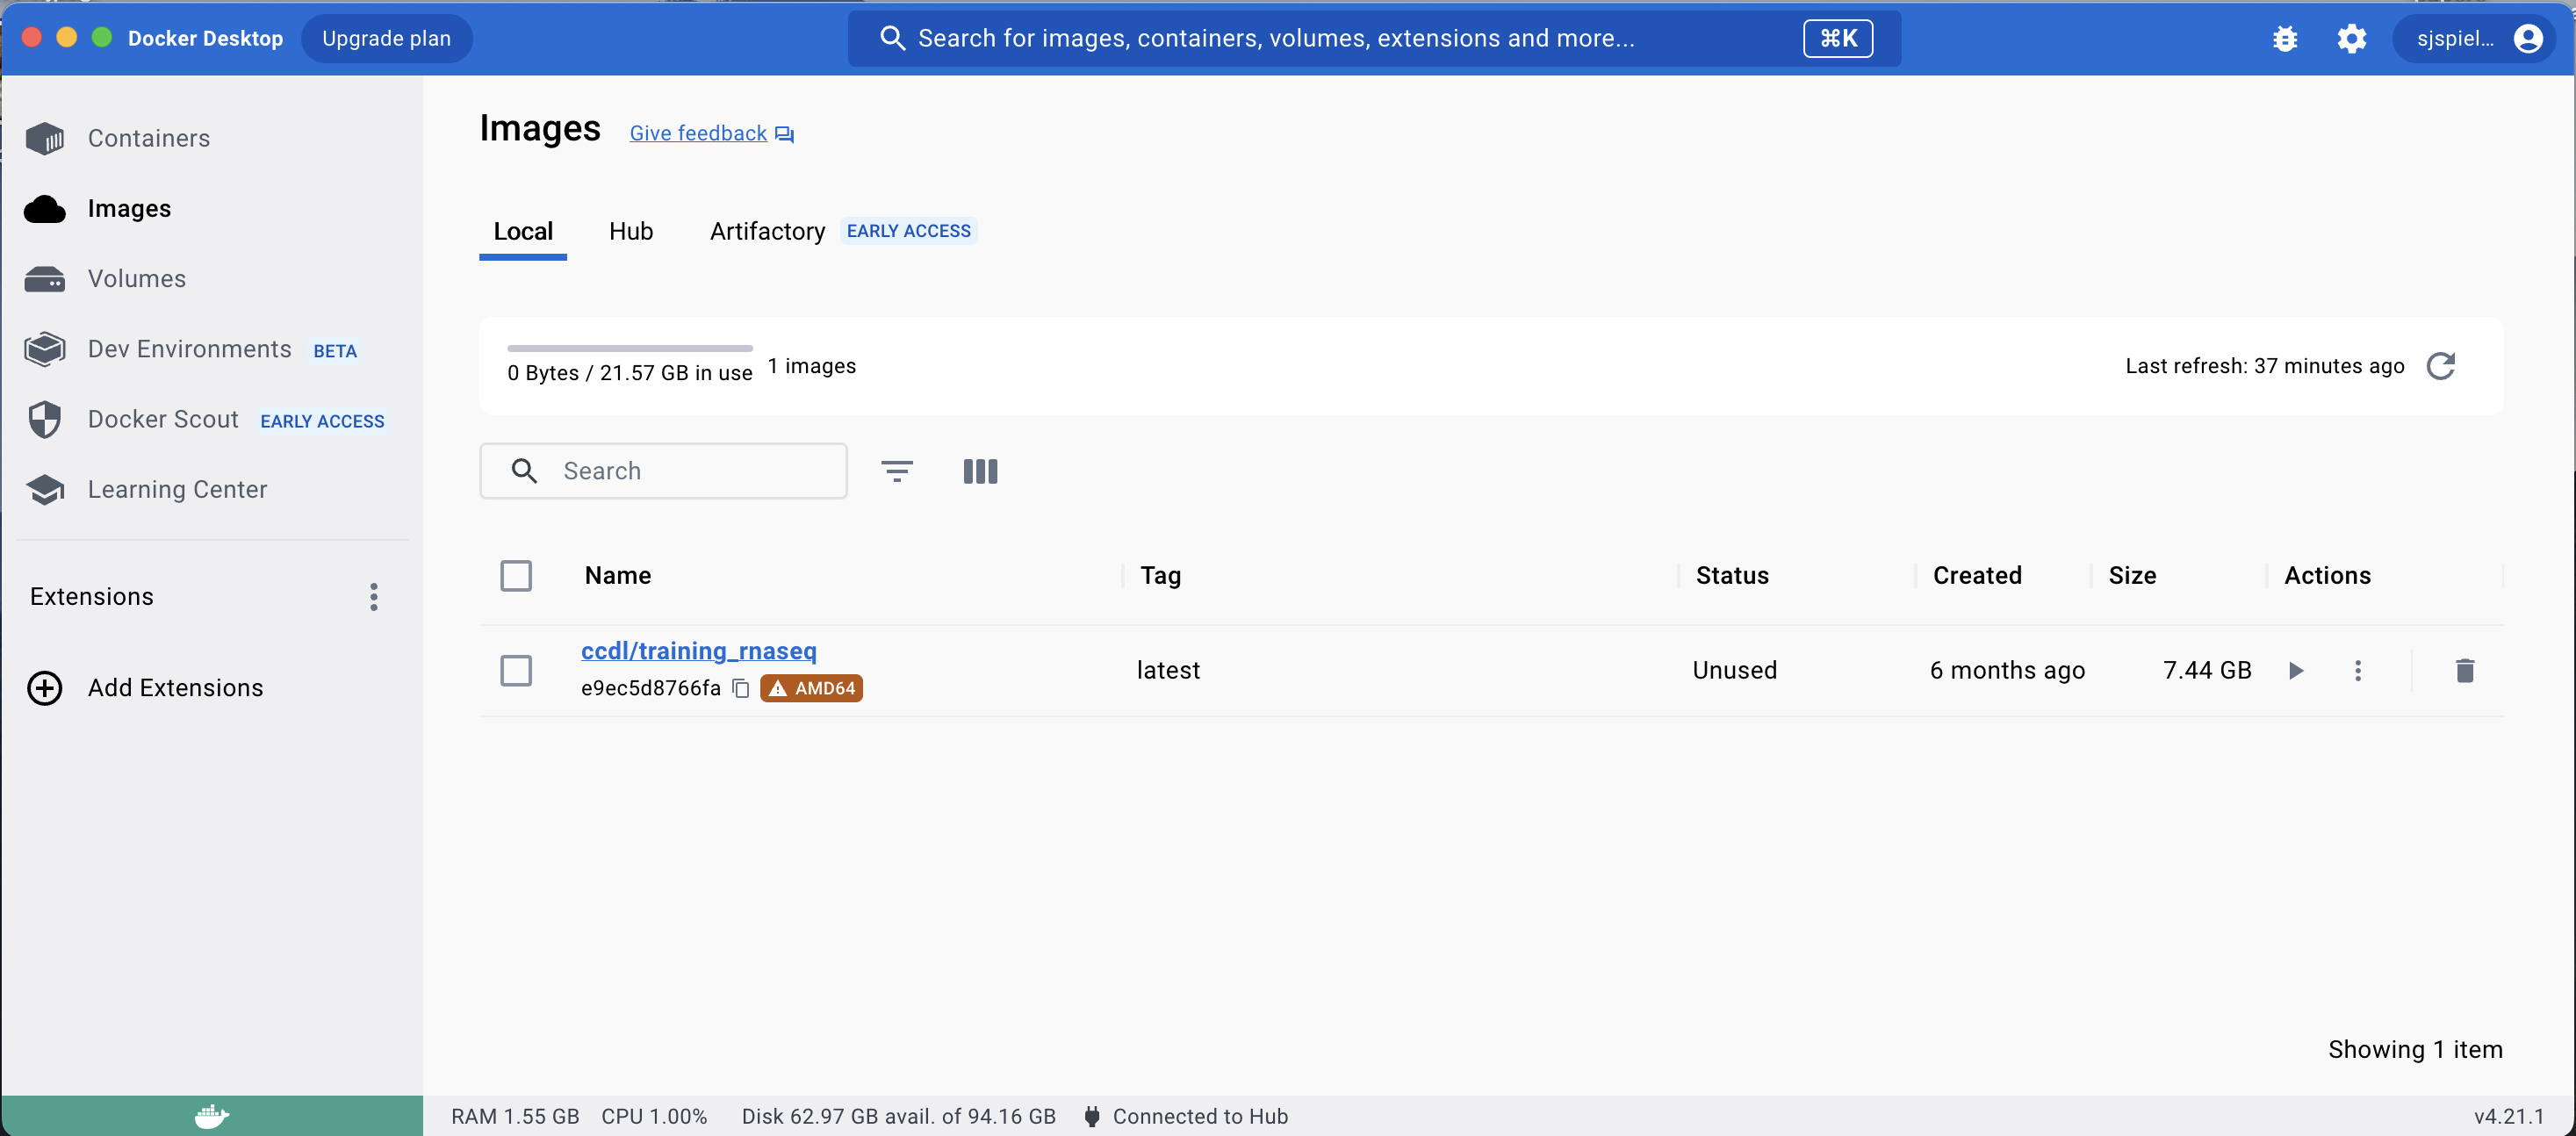
This command will download the docker image from the training workshop. Once this has completed, you will see this new image in the Images tab of Docker Desktop:
From this downloaded image, you can launch a container using this image to fully replicate the workshop environment in a RStudio Server session in your browser.
Modify Docker resources
Because this RStudio Server is running on your computer (not a remote server), it will only have the resources (RAM and CPU) that you provide it. You can set up resource limits by clicking the gear icon in Docker Desktop to access the Settings menu.
![]()
From here, navigate to the Resources tab and select the number of CPUs and amount of RAM you would like your container to have access to. In this example, we have selected 2 CPUs and 8 GB RAM, as well as 2 GB swap memory (amount of memory that Docker can “swap” in to avoid running out of memory).
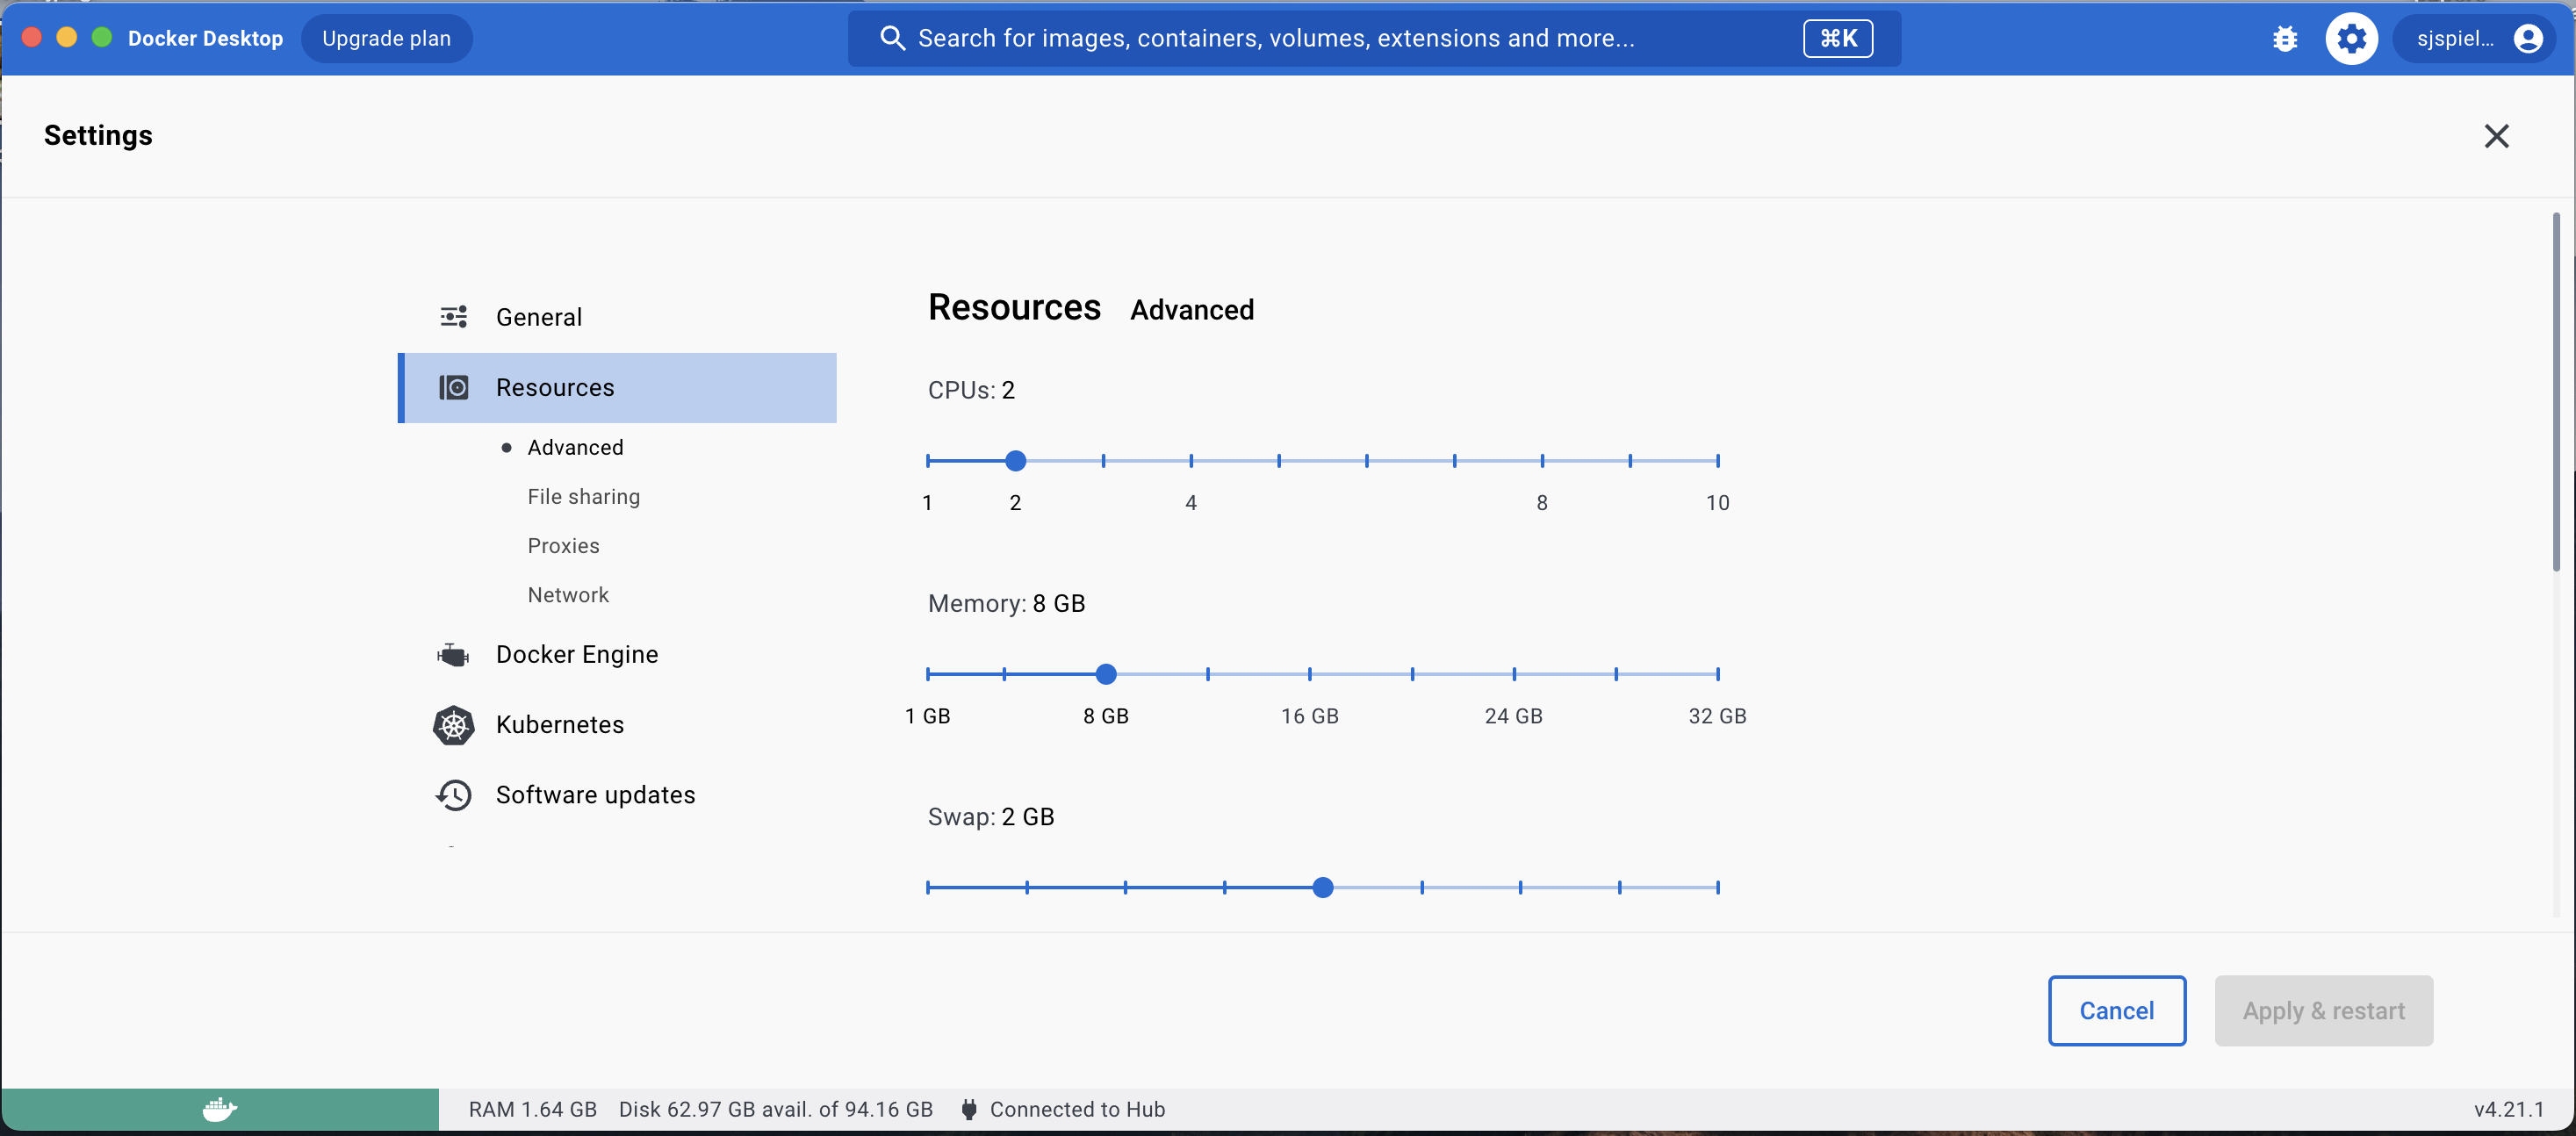
Once you have made your selection, click Apply & restart.
Set up local files
Docker only has access to folders that you explicitly specify when launching an image, so you need to make sure everything you will need is in one place. You can then tell Docker to include this folder in your running container.
If you would like to work with the actual workshop materials, you should download the training-modules folder from the Data Lab’s RStudio Server and then tell Docker to include that folder in your container; this page explains how to transfer files to and from the server.
⚠️ It is important to be aware that any files that you save to the Docker container outside of this specified folder are ephemeral - once you destroy the container, those files will disappear! When working from the container, you MUST save files in your specified folder, or else they will not exist on your computer.
Create the Docker container
Now, you are ready to launch a container using the workshop’s Docker image. These instructions explain how to set that container up to run it for the first time. For all future uses, you can skip these steps and simply run the container you have created here.
In the Docker Images tab, you should see that you now have an image called ccdl/training_rnaseq which you pulled from the command line.
To create a container from this image, click the Run icon:
![]()
You will then see a dropdown menu of Optional settings for this new container; click this menu to reveal these options.
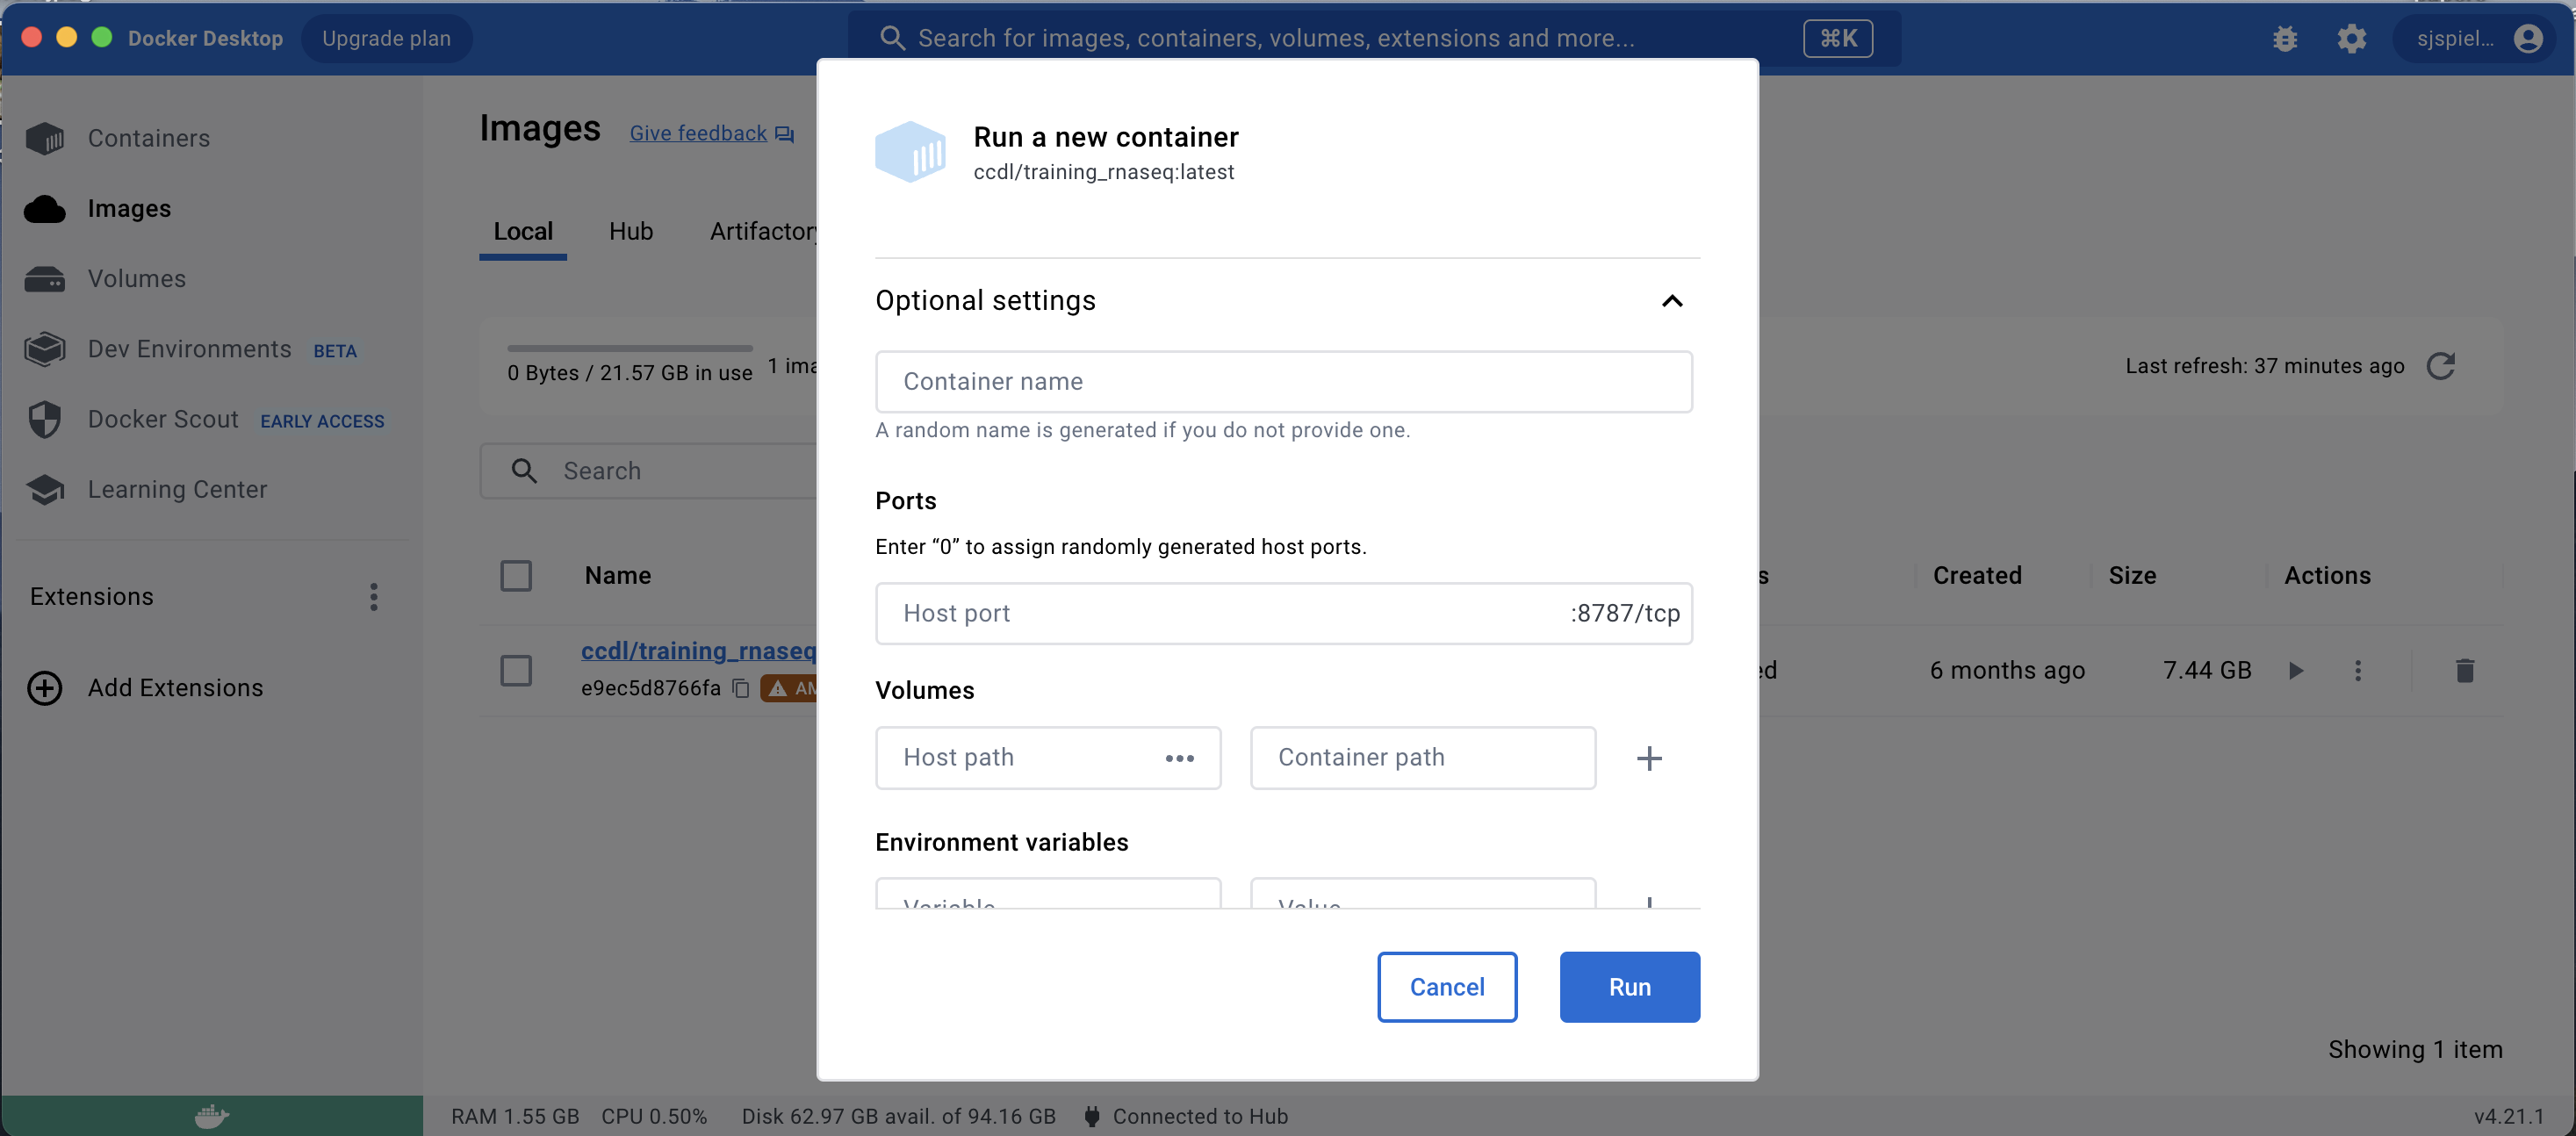
Now, set the following:
- Container name
- You can choose any name you would like here, or let Docker pick a fun random name for you!
- Going forward, this container name will be shown in the “Containers” Docker Desktop tab, and you can always re-launch the container from there.
- Ports
- This setting controls how the RStudio Server is launched in your browser.
Enter a
0in this field to randomly assign a port.
- This setting controls how the RStudio Server is launched in your browser.
Enter a
- Volumes
- This is where you tell Docker which local folder you want to have access to when working in the container.
- First, provide the Host path, which is the local folder on your computer. Click the three dots select folder you want to include in the container.
- Second, provide the Container path, which is where in the Docker container this local folder should appear.
- You will want this to be located within
/home/rstudiodirectory to make it easy to find, so enter something like/home/rstudio/<my_folder>for this path (where<my_folder>is the name of the folder on your computer).
- You will want this to be located within
- Environment variables
- There is one environment variable you need to specify: a password that will allow you to access the RStudio Server once its launched in browser.
- Enter
PASSWORDin the Variable field, and provide a memorable password in the Value field.
Finally, click the Run button at the bottom of this popup to launch a container with these settings.
Now you have created your container! In the future you can skip these variable definition steps and run the container directly from the Containers tab, as described next.
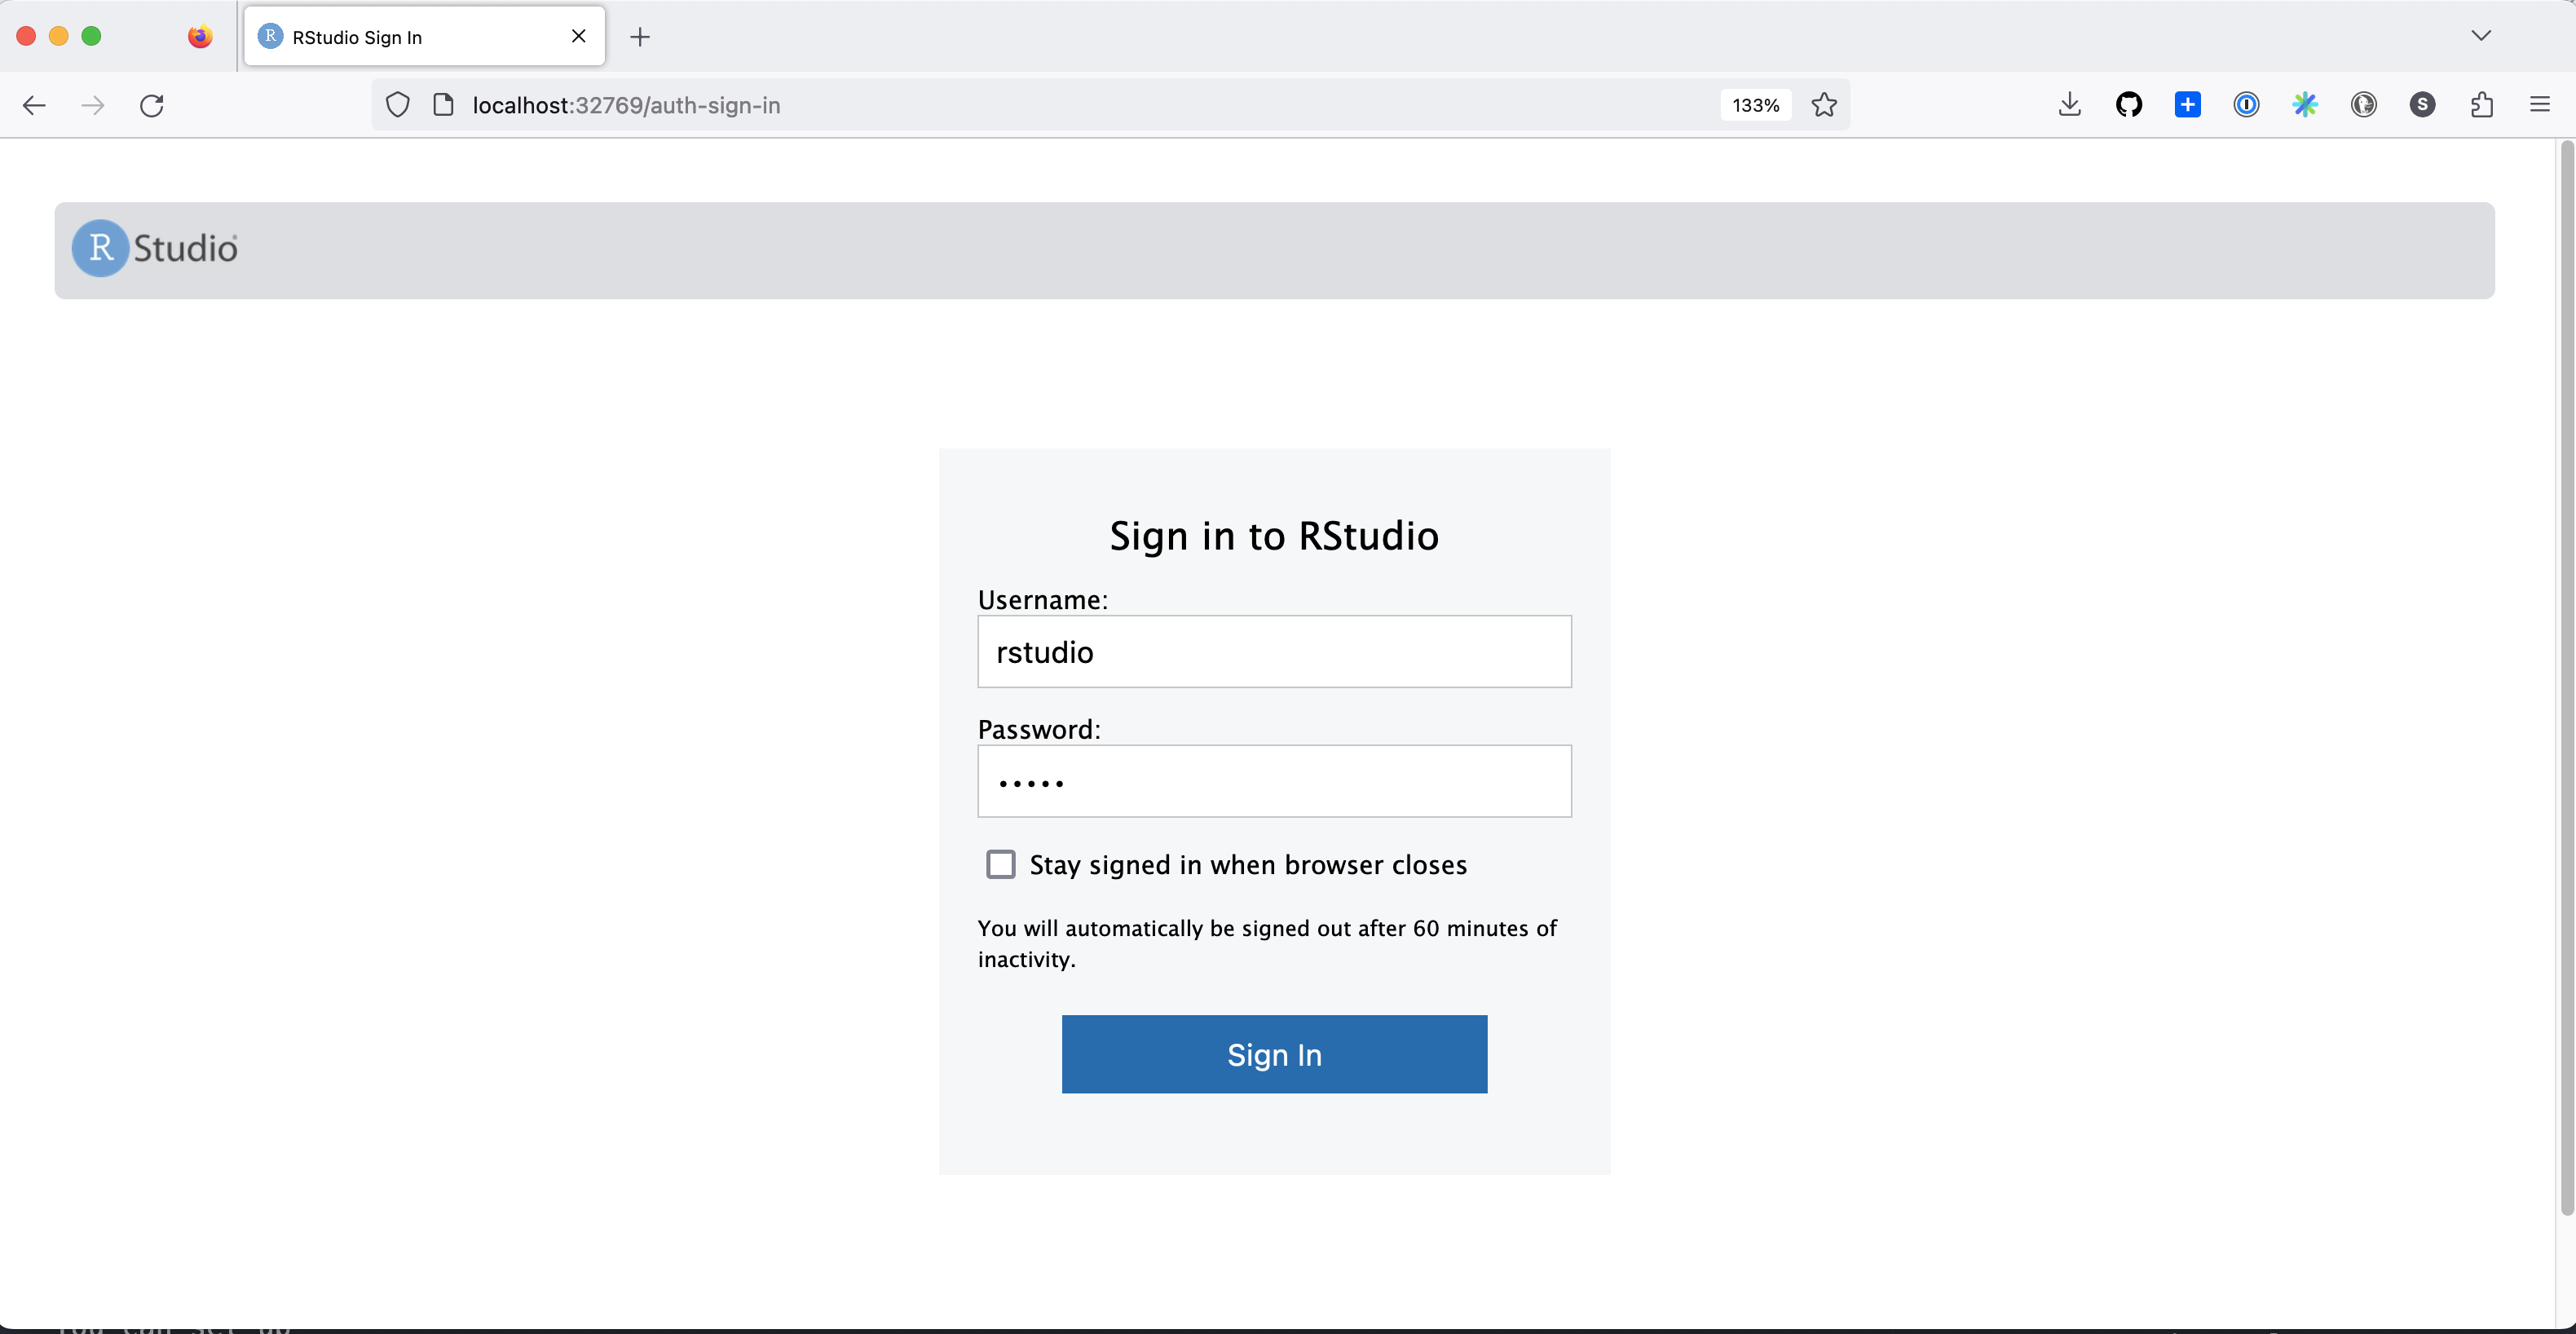
Run the Docker Container
Navigate back to the Containers tab in the Docker Desktop app.
You should see the container you just launched is running.
It will have the name you specified; in this example, the specified name was ccdl-training.
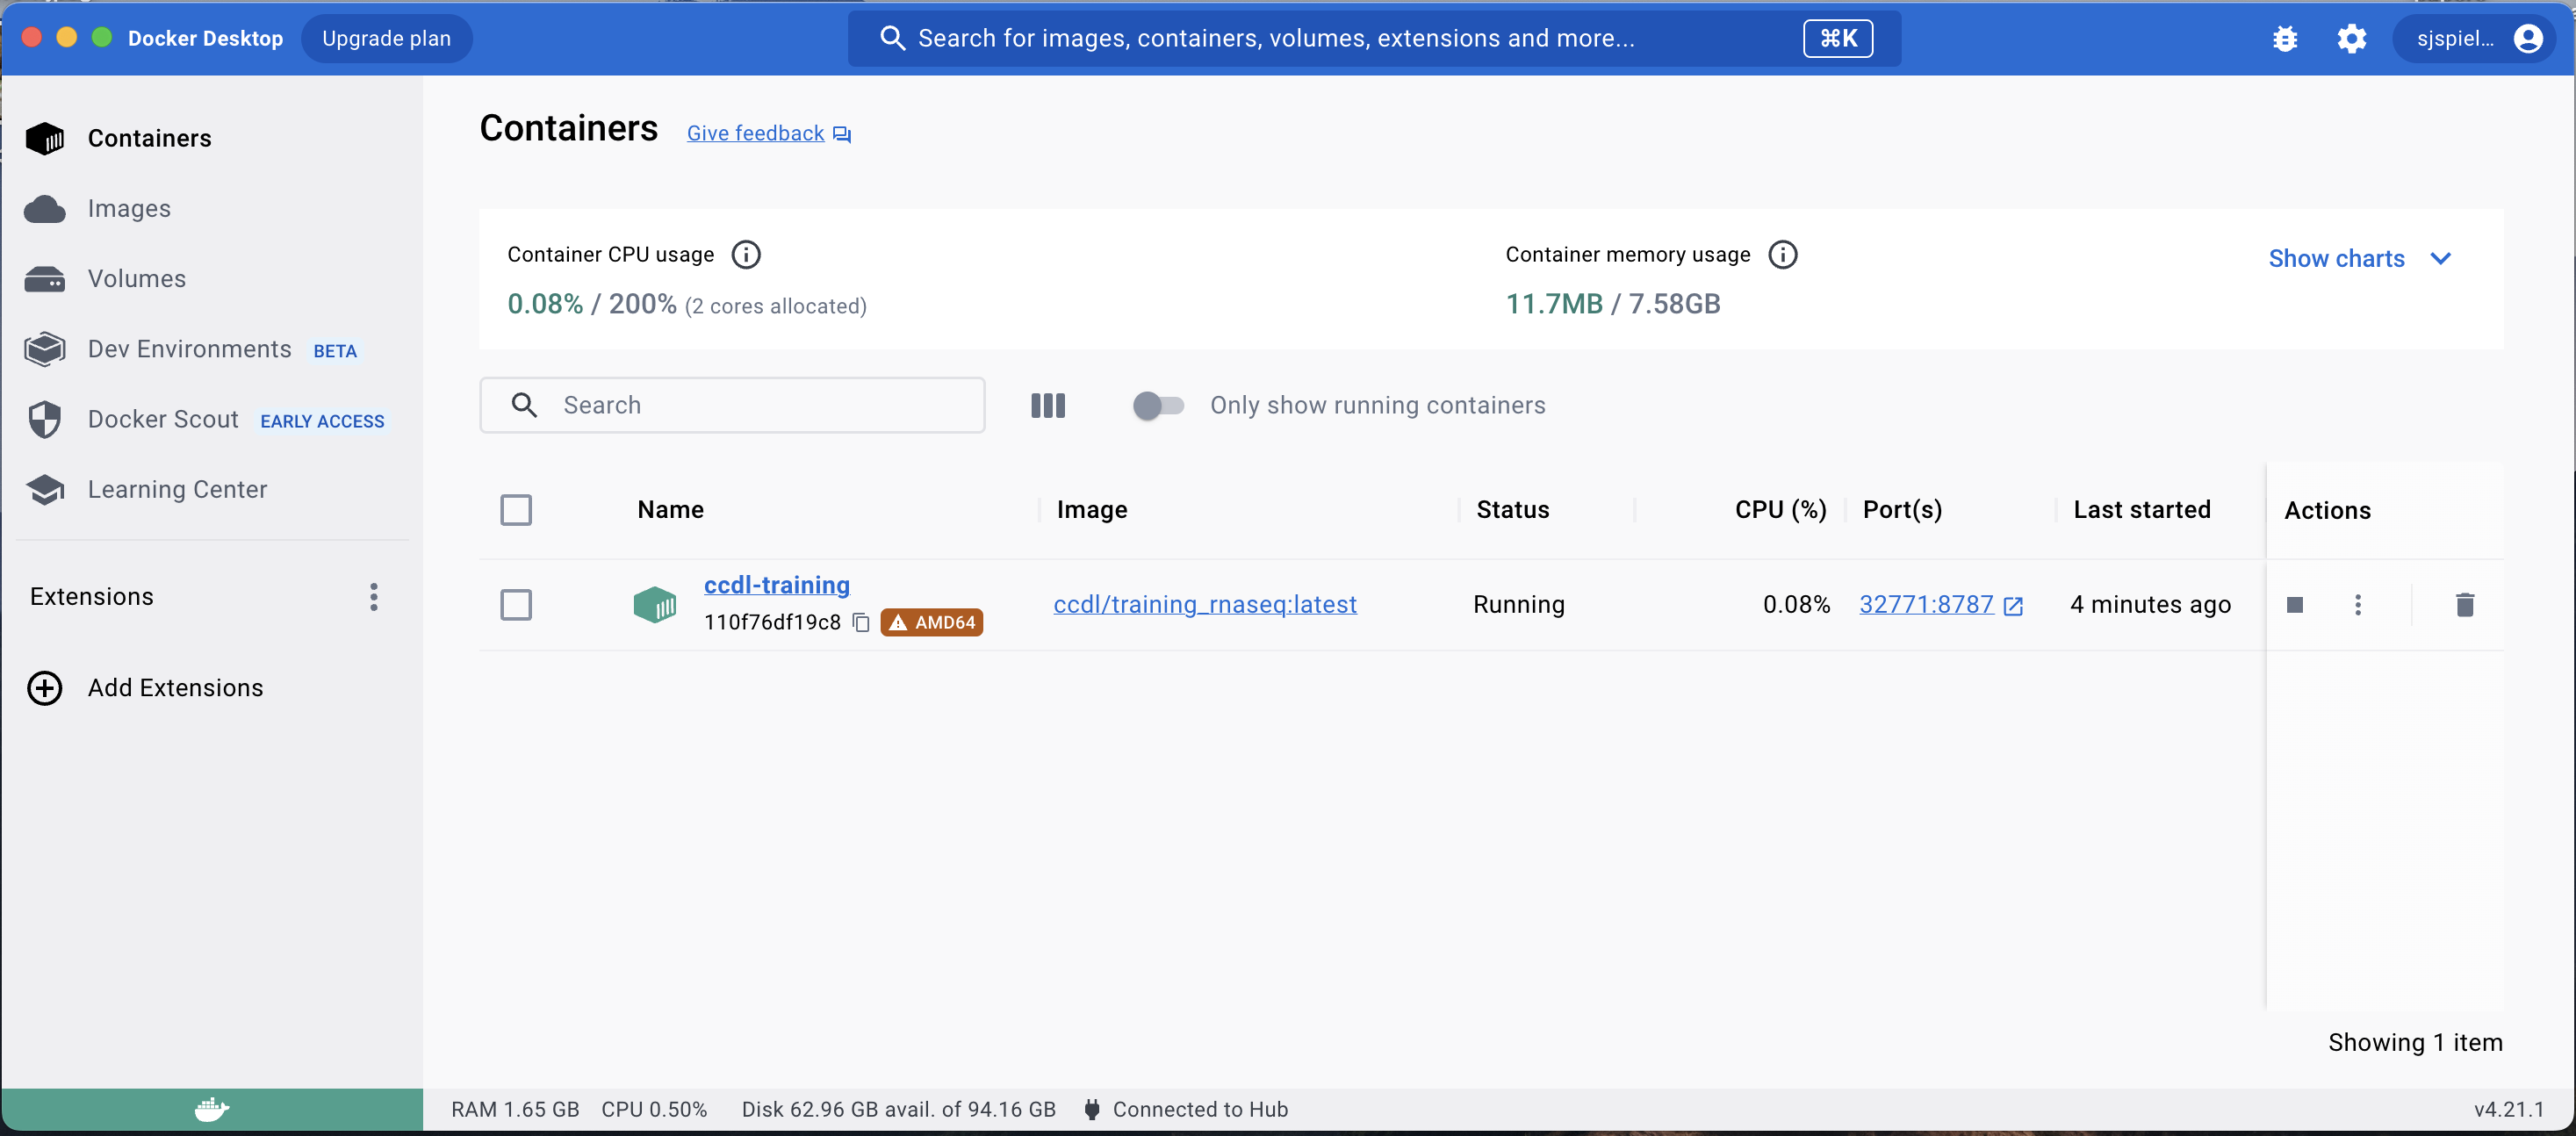
To launch the RStudio Server in this container, click the Port link which will launch the RStudio Server in your browser.
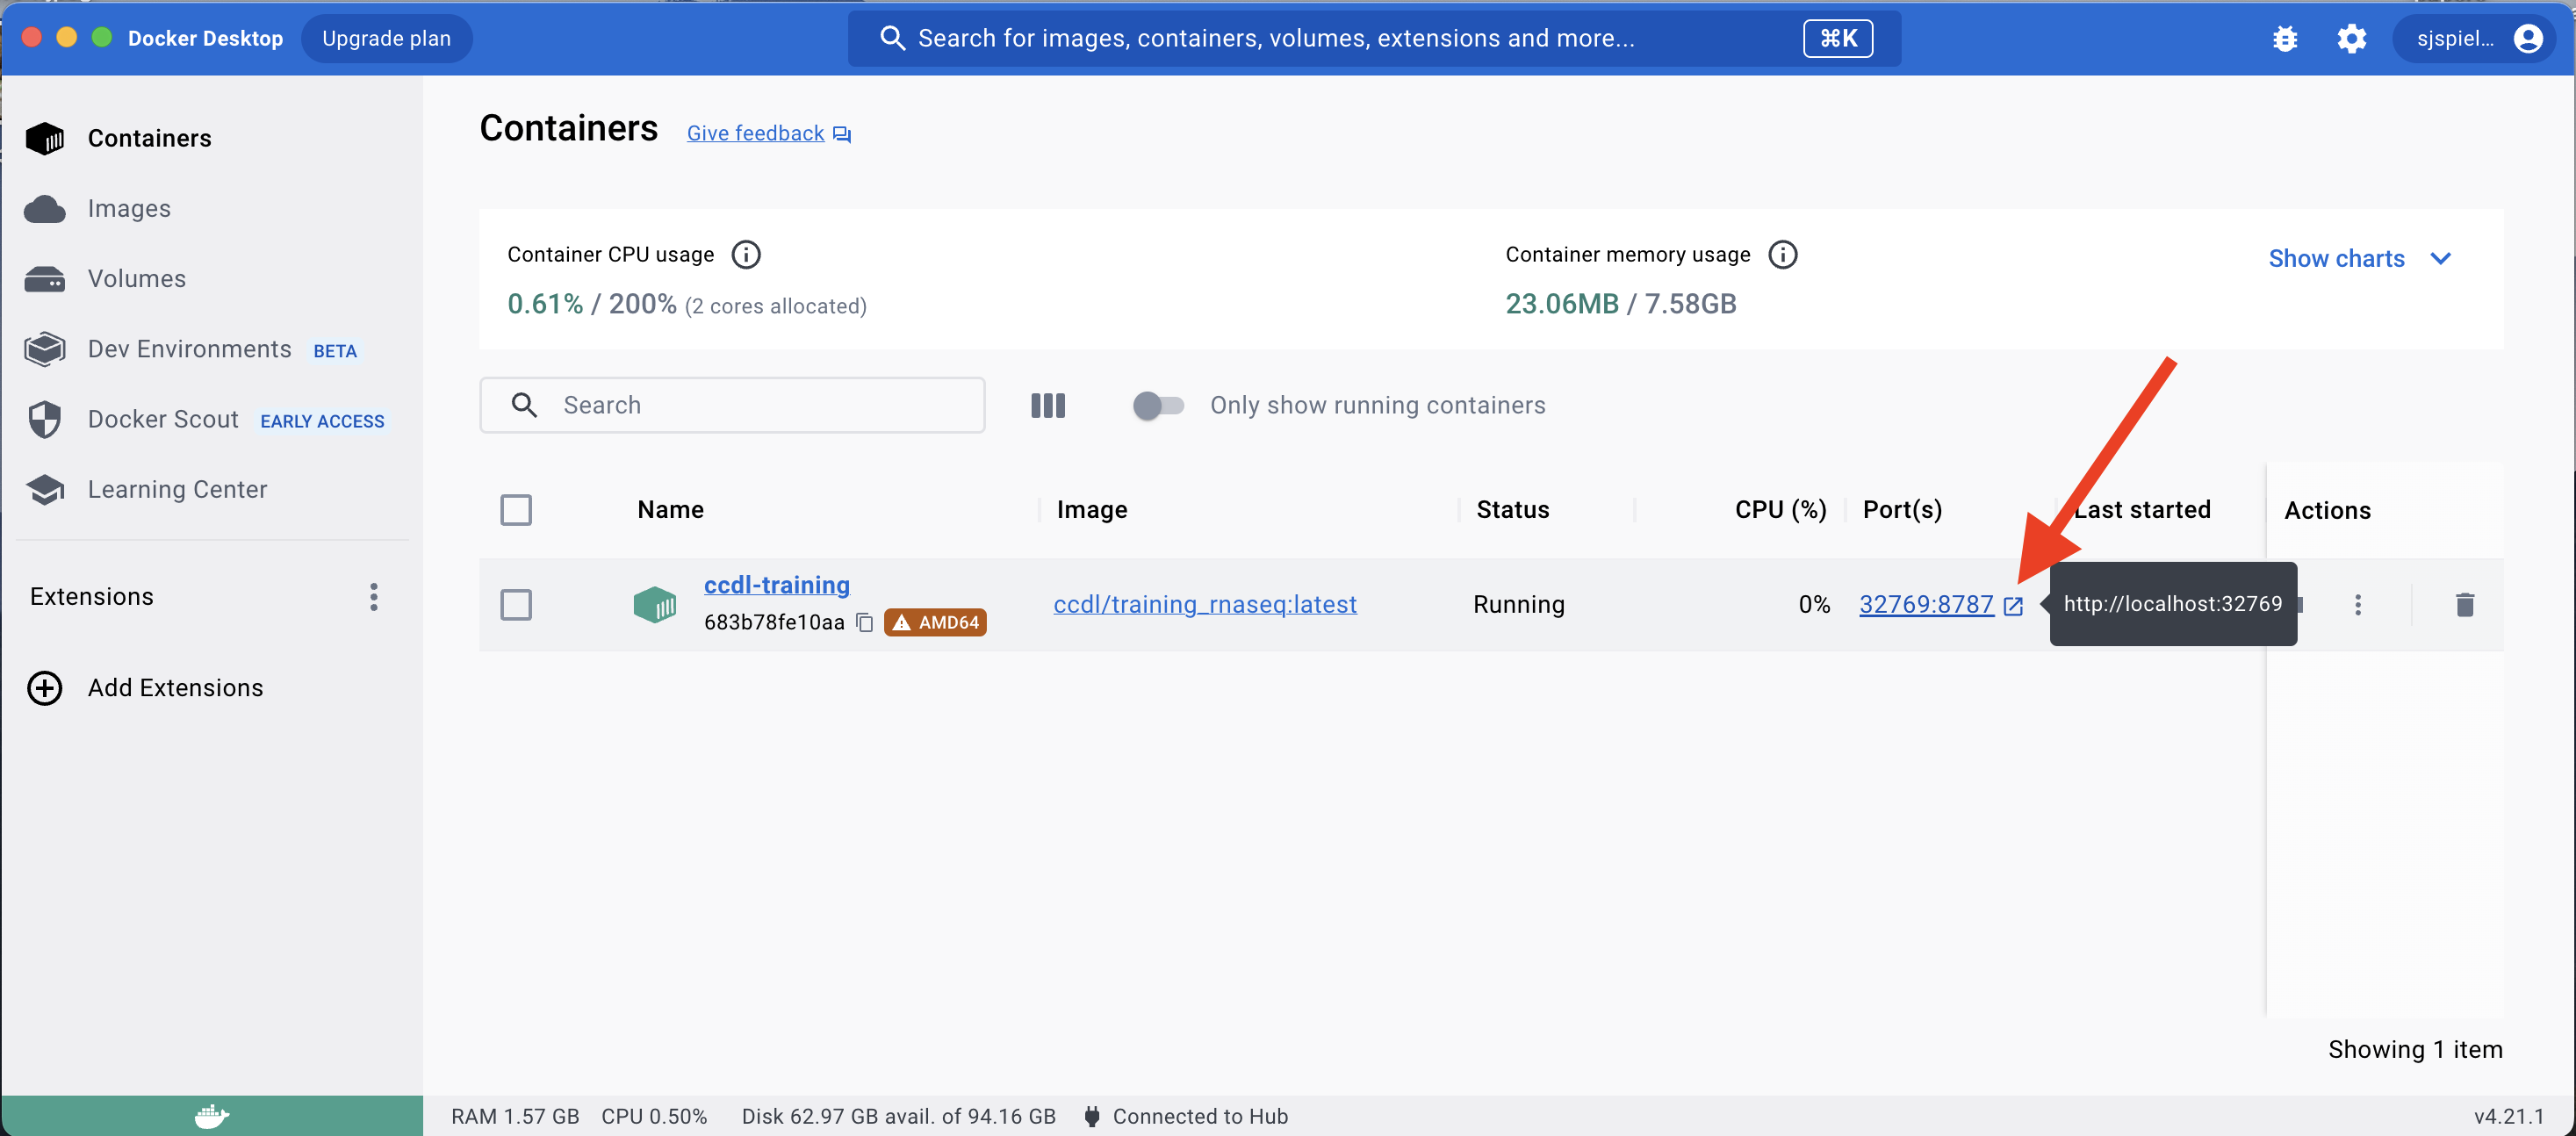
It will prompt you for login information: Your username is always rstudio, and your password is whatever you entered for the PASSWORD environment variable.
Upon logging in, the Files pane should contain the local folder you told Docker to include, so you’re all ready to go!
To stop (but not delete!) the Docker container when you are finished for the day, come back to Docker Desktop and hit the Stop button for this container.
![]()
Once stopped, this icon will switch to a Play button which you can click to re-launch the container.
Use renv post-workshop
Using renv will allow you to replicate the R environment only used in the training workshop, but not other command-line tools.
This link provides full documentation for the renv package: https://rstudio.github.io/renv/articles/renv.html.
Installing dependencies
R, RStudio, and renv
While not strictly required, we recommend that you install the same R version that we used during the workshop.
You can find the specific R version from the Console prompt in the training RStudio Server.
(Protip: You might find the rig software useful for getting this specific R version as well as managing multiple R versions!)
You can download R and RStudio following these instructions.
You can then launch RStudio and install the renv package from CRAN: install.packages("renv").
Command-line tools
You may need to install a few more things (if you have not previously installed them) so that the R packages renv installs can build properly.
- Windows users will need to install the version of
Rtoolsfor Windows that matches your R version; this will allow you to compile R packages.Rtoolsis generally specific to a given R version, so if you have newly downloaded R, you will need to download the correctRtoolsversion for it as well.
- macOS users will need to install
Xcodedeveloper command line tools and a GNUfortrancompiler (gfortran), as described here.- You can install command line tools by launching
Terminaland enteringxcode-select --install - You can install
gfortrandirectly from this link.
- You can install command line tools by launching
Setting up renv
Once all dependencies are installed, launch RStudio and create a new RStudio Project, as described in these instructions. We recommend that you create your project in a folder on your computer which contains all the materials you want to work with.
Next, you will need to download the renv lockfile, which records all R packages and their specific versions, used to set up the workshop you attended.
This lockfile is stored in our training-modules repository.
You can download the exact version of the lockfile used for your workshop by copy/pasting this command into the R Console. Make sure your RStudio Project has launched before you run this command so that this file is downloaded to the correct location on your computer!
download.file("https://raw.githubusercontent.com/AlexsLemonade/training-modules/master/renv.lock")
Finally, it’s time to set up renv!
Run the following command in R Console:
renv::init()
R will then prompt you if you want to proceed (enter Y), and then it will prompt the following:
This project already has a lockfile. What would you like to do?

1: Restore the project from the lockfile.
2: Discard the lockfile and re-initialize the project.
3: Activate the project without snapshotting or installing any packages.
4: Abort project initialization.
Enter 1 to restore the project from the existing lockfile.
At this point, all R packages should automatically install and your R environment will be all set up and ready to go!
⚠️ These installed packages can only be accessed when working in this RStudio Project, so you will always need to work in this RStudio Project to replicate the workshop’s R environment. For more information on how and why this is the case, check out the full
renvdocumentation.
Parting thoughts and further reading
Working with Docker and/or renv can be tricky! If/when you run into trouble setting up environments after training, you can always use Cancer Data Science Slack to ask questions!
For further reading about these tools, we recommend these resources:
- Reproducibility of computational workflows is automated using continuous analysis by Beaulieu-Jones & Greene (2017)
- Digging into Data Science Tools: Docker
- A short guide to using Docker for your data science environment
- The
renvpackage website - The full
renvuser guide